SharePoint 2010: Howto start customize list form (New/Edit/View) using InfoPath Designer 2010

English

In SharePoint 2010 there we have more option to customize list form. For instance, you can use SharePoint Designer 2010 or InfoPath Designer 2010. Since modifying list form using SPD is already exist in previous version. I will just show you how to customize list form using InfoPath Designer 2010.

When customizing list form using InfoPath Designer 2010, you will get all form designer benefit. For example, you can define the field validation rules, parent-child relation etc. And bet what, the process is straight forward. In this very basic how-to, I will demonstrate how to start customize list form using InfoPath Designer 2010. I will create an Book List with “Title” – “Author” – “Status” column. In the New form, I will only show “Title” and “Author” – while in Edit form, “Title” and “Author” will be readonly, but “Status” is editable.

How to customize list form using InfoPath Designer 2010.

  1. Prepare the custom list.

    Prepare custom “Book List” with 3 columns: “Title” – “Author” – “Status”. “Status” field is choice “Available” – “In Used” – “Missing”. After creating the list and preparing columns, we can start to use the list and add a new item in this form.

  2. Start InfoPath Designer

    Start InfoPath Designer and select to design SharePoint List form.

    Type in the SharePoint site URL

    And then select the Book List from the list of available data.

    Finally, click on Finish.

  3. When the form editor open , you can start to edit the New form. I add a title “Book List Entry” and delete the “Status” row.


    And here is the result:

  4. Add “Edit Form” view in the designer, and set Title and Author as readonly.


    Type-in the view title.

    Design the form – add “Status” column in the form.

    Set “Title” and “Author” textbox property to “ReadOnly”

  5. Publish the form to the list.


  6. Configure the “Book List” to use designated form.

    Open the list setting page, and expand context menu for the Forms.

    Since the first view will be the default – our interest is only to the “(Item) Edit Form”. Click on (Item) Edit Form link, and change the Form view.

    You will realize that now you are seeing form services in web part.

    Click on Web Parts Tools tab, and then click on Web Part Properties.

    In the Web Part Properties, select the designated view.

  7. And here we go with the custom “New Form” and “Edit Form” for the list.

    New Form.

    Edit Form.

    Happy design

Tagged with: , ,
Posted in Howto, SharePoint 2010

Howto Series : Administration

English

I am trying to blog howto series on administration with graphical descriptions.

1. Howto configure personal regional settings.
2. Howto limits page layouts availability in web site.
3. Howto enable debuging in SharePoint Web Application.
4. Howto configure alternate access mapping.
5. Howto remove My Site or My Links link.

… and more are coming.

Posted in Office Server 2007, Tips and Tricks, Tools

Howto series : Lambda and SharePoint

English

I wrote some howto series for Lambda and SharePoint, you can find them here:

1. How to use lambda expression in SharePoint Object Model.
2. How to use lambda expression in SharePoint Object Model – working with WebApplication.
3. How to use lambda expression in SharePoint Object Model – working with SPWeb.

.. and more

Posted in Microsoft Sharepoint, Tips and Tricks

Moving to the new home

English

Begining the new Year 2009, I am moving this blog to the new home http://blog.libinuko.com. I’ll keep this location for references – and archives. I still use WordPress as blogging engine in the new home – but with entirely free ideas to put-in plugins, themes etc.

Thanks to WordPress.com which gaves me true blogging experience.


Bahasa

Mengawali tahun 2009, saya memindahkan blog ini ke tempat yang baru  http://blog.libinuko.com. Blog ini akan tetap ada sebagai referensi dan arsip.  

Terima kasih WordPress.com yang telah memberi pengalaman blogging selama ini.

Posted in General

Hyper V Installation using Microsoft Hyper-V and VMWare ESXI

English:

I just found a video comparing installation of Microsoft Hyper-V and VMWare ESXI.

Indonesian:

Ada yang mau mencoba Microsoft Hyper-V atau VMWare ESXI? Temukan caranya Hyper V side-by-side comparison.


Posted in General

Why Should We Use List and/or ID in Query String?

English (versi bahasa Indonesia)

One of my team asked me why should we use “List={GUID}” and/or “ID={ItemID}” in query string? Can’t we use other query string name?

My answer is yes you can use other query string name, but you will lost one of out of the box functionality. Why? Because when you keep with standar “List” or “ID” query string then you don’t need to parse it anymore – then SharePoint provides simple way to get SPList or SPListItem object using SPContext.

The query string  “List={GUID}” has corresponden SPContext.List , and query string “List={GUID}&ID={ItemID}” has the corresponden SPContext.Item. SPContext.List is SPList and SPContext.Item is SPListItem that can be obtained easily if you follow the convention.

So, check your code now. 

-o0o-


Indonesia (see English version)

Ada pertanyaan dari salah satu tim saya kenapa kita harus menggunakan “List={GUID}” dan/atau “ID={ItemID}” di dalam query string? dan apakah kita tidak boleh menggunakan nama lain untuk query string?

Jawabannya adalah tentu saja kita dapat menggunakan nama lain, tetapi kita akan kehilangan salah satu fungsi yang sudah disediakan oleh SharePoint. Mengapa?

Karena jika kita tetap menggunakan standar “List” atau “ID” didalam query string, maka kita tidak perlu melakukan parsing parameter lagi. Dan untuk itu SharePoint telah menyediakan cara yang sangat mudah untuk memperoleh object SPList atau SPListItem dengan menggunakan SPContext.

Query string  “List={GUID}” memungkinkan kita untuk memperoleh SPContext.List , dan query string “List={GUID}&ID={ItemID}” memungkinkan kita untuk memperoleh SPContext.Item. SPContext.List adalah objek SPList dan SPContext.Item adalah objek SPListItem yang dengan mudah diperoleh hanya jika kita mengikuti konvensi tersebut.

Jadi, coba cek lagi apakah sudah mengikuti konvensi yang berlaku?

Posted in Microsoft Sharepoint, Office 12, Office Server 2007, Tips and Tricks

What can cause “Error page has been modified”

English (versi bahasa Indonesia)

For anyone who customize SharePoint using SharePoint Designer, I believe you’ve familiar with “Error page has been modified”. The reason is obvious, you open the page in browser while modifying it using SharePoint Designer. Then save the page withing SharePoint Designer and try to access any links in that page. So, just go back , refresh and the link will works again.

PageRefreshIssue

But how about in a case that this happened in production environment, where nobody edit the page behind the screen. What can cause “Error page has been modified” ?

I have tried some resources from internet and check whether this can help me solve the problem:

1. One or more feature is missing (http://forums.technet.microsoft.com/en-US/sharepointgeneral/thread/9a98188b-9dec-4d85-b8b7-47ba41e5271f/)
2. Use of PublishingLayoutsPage instead of TemplateRedirectionPage (http://blogs.msdn.com/tejasr/archive/2008/06/19/resolution-moss-this-page-has-been-modified-since-you-opened-it-you-must-open-the-page-again.aspx)
3. Use of NLB with affinity set to none (http://support.microsoft.com/kb/892348)
4. Some says that security enhancement in MOSS SP1 (KB936984) /WSS SP1 (KB936988)help to fix this problem.

But unfortunatelly I come back with no luck, untill I read an article “The evil’s of RunWithElevatedPrivilege from Danniel Larson”. I believe that since it drops down to the thread identity, then the current session in page is no longer valid with the links. Thus creating exception “Error page has been modified”.  Then, I instructed my team to change all impersonation method to use

SPUserToken sysToken = SPContext.Current.Site.SystemAccount.UserToken;
using(var systemSite = new SPSite(SPContext.Current.Site.ID, sysToken))
{
    using (var sysWeb = systemSite.OpenWeb(SPContext.Current.Web.ID))
    {
        // Perform elevated actions here
    }
}

instead of using old

SPSecurity.RunWithElevatedPrivilege(delegate()
{
     using(var systemSite = new SPSite(SPContext.Current.Web.Url))
     {
           using (var sysWeb = systemSite.OpenWeb(SPContext.Current.Web.ID))
          {
               // Perform elevated actions here
          }

      }
});


That is and the production issues gone. So from now I would add one more entry to the list, Minimalize using RunWithElevatedPrivilege in your code, and use SPUserToken instead.

-o0o-


Indonesia (see English version)

Bagi rekan-rekan yang sering bekerja dengan SharePoint Designer, pesan kesalahan berikut ini pasti sering dijumpai “Error page has been modified”. Penyebabnya jelas sekali, karena kita membuka halaman di browser sementara di balik layar dilakukan editing dengan menggunakan SharePoint Designer. Kemudian setelah melakukan editing dan menyimpan halaman di SharePoint designer, kita langsung mengklik salah satu link di halaman yang telah dibuka. Cara mengatasinya cukup mudah , kembali ke halaman semula , refresh dan link-link akan bisa diakses seperti semula.

PageRefreshIssue

Tetapi bagaimana dengan kejadian yang muncul di server produksi? Di server produksi, tidak seorang pun mengedit halaman dengan SharePoint Designer. Jadi apa yang bisa menyebabkan “Error page has been modified” ?

Seperti biasa, saya mencari-cari informasi di internet dan menemukan beberapa hal dibawah yang mungkin dapat membantu:

1. Ada fitur yang ada di datastore tapi hilang secara fisik (http://forums.technet.microsoft.com/en-US/sharepointgeneral/thread/9a98188b-9dec-4d85-b8b7-47ba41e5271f/)
2. Tidak menggunakan TemplateRedirectionPage tapi PublishingLayoutsPage (http://blogs.msdn.com/tejasr/archive/2008/06/19/resolution-moss-this-page-has-been-modified-since-you-opened-it-you-must-open-the-page-again.aspx)
3. Menggunakan NLB dengan affinity diatur none (http://support.microsoft.com/kb/892348)
4. Beberapa mengatakan bahwa perbaikan prosedur keamanan di MOSS SP1 (KB936984) /WSS SP1 (KB936988) akan membantu menyelesaikan masalah.

Sayangnya semua hal diatas sudah terpenuhi, tetapi tetap saja masalah tersebut muncul. Sampai akhirnya saya membaca artikel tentang RunWithElevatedPrivilege – “The evil’s of RunWithElevatedPrivilege dari Danniel Larson”. Dari penjelasan yang ada, saya menduga bahwa penyebabnya adalah karena prosedur tersebut mengganti identitas thread dan menjalankan di thread lain, sehingga halaman yang sedang dibuka akan kehilangan “hubungan” dengan server (mirip dengan pada saat kita menyimpan dengan menggunakan SharePoint Designer). Akibatnya, link-link yang ada di halaman sudah tidak valid lagi dan muncul “Error page has been modified”. 
Berbekal dari dugaan itu, saya kemudian meminta rekan-rekan di team untuk mengganti cara impersonation untuk mengugnakan SPUserToken 

SPUserToken sysToken = SPContext.Current.Site.SystemAccount.UserToken;
using(var systemSite = new SPSite(SPContext.Current.Site.ID, sysToken))
{
    using (var sysWeb = systemSite.OpenWeb(SPContext.Current.Web.ID))
    {
        // Perform elevated actions here
    }
}

dan menghapus RunWithElevatedPrivilege

SPSecurity.RunWithElevatedPrivilege(delegate()
{
     using(var systemSite = new SPSite(SPContext.Current.Web.Url))
     {
           using (var sysWeb = systemSite.OpenWeb(SPContext.Current.Web.ID))
          {
               // Perform elevated actions here
          }

      }
});


Dan seperti yang diharapkan, masalah di production akhirnya teratasi. Jadi mulai dari saat ini saya akan menambahkan satu lagi di dalam daftar , Kurangi penggunaan RunWithElevatedPrivilege dan sedapat mungkin gunakan SPUserToken.  

Posted in Microsoft Sharepoint, Office 12, Office Server 2007, Tips and Tricks

Creating Weather Webpart using SharePoint Designer

English (versi bahasa Indonesia)

Weather webpart is one of most popular wepart to place in homepage. Many available resources out-there in internet using C# and webservices. But instead of create weather webpart using Visual Studio I will show you how create it using SharePoint Designer.

HomeShow

The process is pretty simple,
1. You need to create a new page in Sharepoint as working canvas.
2. In that working canvas, drop webpart zone and dataview webpart.
3. Find appropriate weather datasource and format dataview webpart.
4. Export the new formatted webpart and delete working canvas.
5. Distribute / use the webpart. Package in solution file if necessary.

Initially open SharePoint site using SharePoint Designer. To prepare a page for working canvas, just create a new aspx page.

Bmg0

On the new page, attach default master page by using attach master page under format menu.

Bmg01

On the PlaceHolderMain in the page, click Create Custom Content to detach this section from master page.

 CustomPlace

Then in the new custom content area, insert “Web Part Zone” and “Data View”  component from SharePoint Controls.

InsertDataView

Next, we need the reference to get weather information from. SharePoint designer provides wide range of data source type, starting from SharePoint List, SharePoint Libraries, Database Connection, XML Files, Server-side scripts, XML Web Services and Linked sources. Since my country has “BMG” which announce weather data officially, in this case I will use XML files as my datasource.

XmlData

For me, the location of weather data is http://www.bmg.go.id/dataxml/cuaca_indo_1.xml or http://www.bmg.go.id/dataxml/cuaca_indo_2.xml. Saving that location into XML data files, give me a new datasource to working with.

Bmg3

Then click Show Data on the new datasource.

Bmg4

In the data source detail, we can select appropriate fields to show. In this case I select “Kota”, “Cuaca”, “SuhuMin” and “SuhuMax”. And then click Multiple Item View.

Bmg5

By default you will get a table from XML datasource. Like the one bellow.

Bmg6

Since I only want few big cities in Indonesia, then I click filter on the Common Data View Tasks.

Filter

Next, is to insert icons to describe weather conditions such as raining, clear, clouds etc. To select appropriate icon, we can test on the “Cuaca” field and choose correct icon ( inspect line number 108 – 118 in the figure below). I also make the table into single column by moving the field content into leftmost column and deleting other column in original table.

Bmg9

Since I transform to single column, then I don’t need to keep the header anymore. So I just change the header into long cell title.

Bmg10

Saving the page and opening in browser, allows me to export the webpart and import back in the future.

Export

Thats for now, just couple minutes to create weather webpart. For you who curious with the webpart, please download it from the attachment ( BMGLike.webpart (17 KB) ).

-o0o-


Indonesia (see English version)

Webpart cuaca merupakan salah satu webpart populer yang sering diminta oleh client. Di internet bisa kita temukan webpart cuaca yang berbayar maupun gratis yang dibuat dengan C# dan web services. Di artikel ini, alih-alih membuat webpart dengan menggunakan Visual Studio, saya akan mendemonstrasikan pembuatannya dengan menggunakan SharePoint Designer.

HomeShow

Prosedurnya cukup sederhana, 
1. Buat halaman aspx di SharePoint sebagai tempat eksperimen.
2. Tambahkan webpart zone dan dataview webpart di halaman kerja tersebut.
3. Tambahkan sumber data cuaca yang sesuai dan format dataview webpart agar tampil cantik.
4. Export webpart yang baru ke dalam 1 file dan hapus halaman kerja.
5. Distribusikan webpart dan masukkan ke dalam solution package jika perlu.

Untuk menyiapkan halaman kerja, buka SharePoint site dengan menggunakan SharePoint Designer. Dari menu file, buat sebuah halaman ASPX baru.

Bmg0

Di dalama yang baru terbentuk, buat referensi ke master page dengan menggunakan menu attach master page.

Bmg01

Setelah di-tempel dengan master page, maka secara default design dan isi halaman akan mengikuti master page. Klik Create Custom Content di bagian PlaceHolderMain untuk memulai membuat kustomisasi di halaman itu.

 CustomPlace

Di area custom content yang baru terbentuk, tambahkan “Web Part Zone” dan “Data View” webpart didalamnya.

InsertDataView

Selanjutnya yang kita butuhkan adalah sumber data. SharePoint Designer memberikan kemudahan untuk menggunakan beberapa jenis sumber data misalnya, SharePoint List, SharePoint Libraries, Database Connection, XML Files, Server-side scripts, XML Web Services dan Linked sources. Disini saya akan menggunakan data yang disediakan secara cuma-cuma oleh BMG , berupa XML file. Kita dapat langsung menggunakan referensi berupa URL ke XML yang bersangkutan.

XmlData

Lokasi XML data yang disediakan oleh BMG adalah di http://www.bmg.go.id/dataxml/cuaca_indo_1.xml atau http://www.bmg.go.id/dataxml/cuaca_indo_2.xml. Simpan informasi lokasi tersebut sebagai sumber data XML yang baru.

Bmg3

Kemudian klik “Show Data” pada sumber data XML yang terbentuk.

Bmg4

Didalam data source detail, kita dapat menentukan field-field yang akan ditampilkan. Disini kita ambil “Kota”, “Cuaca”, “SuhuMin” dan “SuhuMax”. Kemudian klik Multiple Item View.

Bmg5

Secara otomatis, kita akan memperoleh tabel yang diperoleh dari field-field yang ditentukan tadi, seperti dibawah.

Bmg6

Kita juga dapat memfilter agar menampilkan beberapa kota besar di Indonesia saja. Caranya, dengan menentukan filter dari properti data view webpart di  Common Data View Tasks.

Filter

Agar tampilannya menjadi cantik, kita bisa menambahkan icon untuk hujan, cerah, berawan dsb. Untuk mendapatkan icon yang sesuai, maka kita gunakan xsl:choose dan mengetes nilai field Cuaca (perhatikan baris 108 – 118 pada gambar dibawah). Saya juga mengubah tabel menjadi 1 kolom, dengan memindahkan isi field lain ke kolom paling kiri dan menghapus kolom yang tidak digunakan. 

Bmg9

Judul tabel juga diubah dengan mengubah table headernya, dan menyesuaikan dengan format 1 kolom.

Bmg10

Simpan halaman yang sudah selesai diedit dan kemudian buka di browser. Hasilnya adalah halaman dengan weather webpart yang baru, tugas kita berikutnya adalah mengeksport webpart tersebut dan siap untuk didistribusikan.

Export

Akhirnya, mudah-mudahan step-by-step diatas memberikan ide untuk rekan-rekan semua. Untuk yang tidak mau report, berikut ini adalah webpart yang sudah jadi ( BMGLike.webpart (17 KB) )


Posted in Microsoft Sharepoint, Office 12, Office Server 2007, Tips and Tricks

MOSS 2007 : Howto override page redirection Url

English (versi bahasa Indonesia)

I had a question from one of my friend “How can I override page redirection Url?”. He was using inline C# code which is not my preference – because it adds additional page-parser process and introduce new security consideration. His code also diminish upload attachment function in the original form.
My first suggestion was to create a new links that construct custom “Source=” url to the original form – but this is not what he looks for. He doesn’t want to replace the “New Item” menu with a link.

So in this case, he wants to click “New Item” menu in a list and redirected to custom page after sucessfull submission or cancelation.

ItemRedirect1

Technically, after we click “New Item” we’ll be redirected to “..\NewForm.aspx?RootFolder=….&Source=….”. And guess what – the “Source” is the location after we submit “OK” or press “Cancel”.

So – how can we change the “Source” url? Use Javascript !

Open “NewForm.aspx” using SharePoint Designer and find “PlaceHolderMain” content Id. Place following custom javascript just after tag definition.

function PreSaveAction()
{
     // TODO : create some actions here
     return true;
}

ItemRedirect2

Remember that the name of the function MUST BE PreSaveAction and it must return true.

Next, in the function I add operation to replace original action url with the new construction – I just need to change the text after “Source”. What you need to do, is change newSrcUrl variable to match with the custom page in your location. 

––o0o––


Indonesia (see English version)

Baru-baru ini saya mendapat pertanyaan dari seorang kawan tentang “Bagaimana cara mengganti halaman redirect? “. Menurutnya, dia sudah menggunakan inline C# namun akibatnya dia tidak dapat memanfaatkan upload attachment yang ada di form asli. Saya sendiri kurang sependapat dengan penggunaan inline C# itu, sebab inline C# akan menambah beban kerja server untuk memparsing dan juga membuka resiko keamanan yang baru.

Anjuran saya adalah dengan menggunakan link yang sudah diubah sedemikian rupa sehingga “Source” url disesuaikan dengan apa yang diinginkan. Tapi saran tersebut tidak sesuai dengan keinginannya, karena hal ini berarti mengganti menu “New Item” dengan menggunakan link.

Jadi, yang dia inginkan adalah tetap menggunakan menu “New Item” tetapi dapat mengganti halaman yang dibuka setelah submit atau cancel.

ItemRedirect1

Pada dasarnya, setelah kita mengklik “New Item” , maka kita akan diarahkan pada alamat “..\NewForm.aspx?RootFolder=….&Source=….”. Dan “Source” adalah lokasi yang akan dibuka ketika kita mensubmit form dengan mengklik “OK” atau menekan “Cancel”.

Jadi bagaimana kita dapat mengganti “Source” url? Gunakan Javascript !

Buka “NewForm.aspx” dengan menggunakan SharePoint Designer, dan cari tag id yang bertuliskan “PlaceHolderMain”. Kemudian tambahkan javascript berikut setelah tag tersebut,.

function PreSaveAction()
{
     // TODO : create some actions here
     return true;
}

ItemRedirect2

HATI-HATI, bahwa nama fungsi javascript tersebut HARUS  PreSaveAction dan nilai kembaliannya HARUS true.

Didalam fungsi javascript yang baru, kita hanya perlu menambahkan operasi untuk mengganti action url yang lama dengan action url baru. Di action url baru inilah kita definisikan “Source” url agar merujuk pada halaman web custom yang kita inginkan. Dari gambar diatas, Anda hanya perlu mengganti variable newSrcUrl agar sesuai dengan yang diinginkan – atau kalau perlu merubah operasi untuk mengganti “Source” url agar lebih robust.

––o0o––

Posted in Microsoft Sharepoint, Office 12, Office Server 2007, Tips and Tricks

MOSS 2007: How to create sub menu for context item

English (versi bahasa Indonesia)

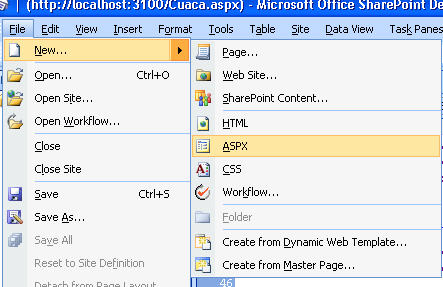
Features have been introduced as one of building block in SharePoint 2007. Using feature ones could extend the capabilities of SharePoint, from just a simple ActionMenu to the site definition – all of them can be done using feature. 
I have created many ActionMenu that extend “EditItem” block in SharePoint but sometimes its not enough. How about creating sub menu for context item – just like “Send to” context menu?

SendToItem

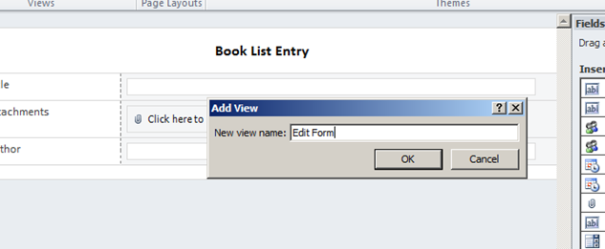
Picture 1. Sub menu in context item

I can not find any information to create sub menu using feature – please correct me. So what can we do? Well…we’ll do the old way – extending the ows.js with our javascript.

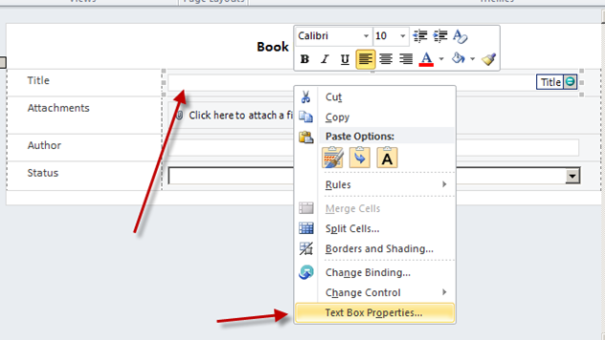
Then if we want to create a new context “Comments” menu with “View Comments” and “Add Comments” for list item like this picture, what can we do?

CommentsSubmenu

Picture 2. Custom sub menu in context item

If you look at ows.js and start finding “Add[???]MenuItems” function then you’ll realize that it always calls “Custom_Add[???]MenuItems”. The last function is our place to make customization. For example, if I want to customize the context menu of ListItem then I need to define “Custom_AddListMenuItems” as follows,

function Custom_AddListMenuItems(m, ctx)

  AddCommentSubMenu(m,ctx);
  AddAttachmentSubMenu(m,ctx);
  CAMSep(m);
  return false;
}

We call “CAMSep(m)” to create separator and returning false to enable rendering default context menu item.  I create “Comments” and its submenu using “AddCommentSubMenu(m,ctx)” function like this,

function AddCommentSubMenu(m,ctx)
{
    strDisplayText=”Comments”; 
    strImagePath=ctx.imagesPath+”reply.gif”;
    var sm=CASubM(m,strDisplayText,strImagePath,””,400);
 
    sm.id=”ID_Comment”;
    var menuOption;
    
    // define your own action
    strAction=””;
    menuOption=CAMOpt(sm, “View comments”, strAction,””);

    menuOption=CAMOpt(sm,”Add comment”, strAction,””);
}

The “CASubM()” is the main function to create sub menu. If you look for the function in ows.js, you’ll find the definition for the function,

function CASubM(p,wzText,wzISrc,wzIAlt,wzISeq,wzDesc)

I guess I’ll make my guess for the parameters,

– p , the menu to attach
– wzText , text to display in the sub menu
– wzISrc  , icon location for the sub menu
– wzIAlt   , alt text for the image icon
– wzISeq  , I am not sure but I thing this related sequence number
– wzDesc ,  I am not sure either , it should be a description but I saw ows.js never put any text on it.

Anyway, you only need to modify parameter p, wzText, wzISrc, wzIAlt and leave default value for the last 2 parameter.

After we done with customization, put the script to the page as reference or as inline javascript, and now you can have your own sub menu for context item.

––o00––


Indonesia (see English version)

Features merupakan salah satu terminologi baru yang diperkenalkan di SharePoint 2007. Kita dapat menggunakan feature untuk menambah fungsi-fungsi baru didalam SharePoint – mulai dari sekedar menambahkan ActionMenu sampai membuat site definition baru – semua dapat dilakukan dengan menggunakan feature
Didalam banyak kesempatan saya sering membuat ActionMenu untuk menambah fungsi di bagian “EditItem” didalam list-item SharePoint – namun kadangkala hal itu masih belum cukup. Salah satu yang mungkin kita inginkan adalah, bagaimana cara membuat sub menu untuk menu context – seperti “Send to” dibawah ini?

SendToItem

Gambar 1. Sub menu didalam menu context

Sampai saat ini saya belum punya cara termudah untuk membuat sub menu dengan menggunakan feature (mungkin kita bisa menggunakan feature receiver – tapi berarti kita harus membuka visual studio) CMIIW. Jadi apa yang bisa kita lakukan? Yah terpaksa kita lakukan dengan cara lama, dengan memanfaatkan ows.js dan menambah fungsi javascript tambahan. 

Sebagai contoh, disini kita akan menambahkan menu context baru “Comments” dengan sub menu “View Comments” dan “Add Comments” seperti gambar dibawah.

CommentsSubmenu

Picture 2. Custom sub menu in context item

Jika kita perhatikan didalam ows.js , setiap fungsi “Add[???]MenuItems” akan memanggil “Custom_Add[???]MenuItems”. Contohnya, fungsi “AddListMenuItems” akan memanggil fungsi “Custom_AddListMenuItems”. Didalam fungsi “Custom_AddListMenuItems” inilah kita dapat menambahkan fungsi-fungsi baru seperti yang kita inginkan.

Disini kita akan menambah menu di list item, jadi disini kita definisikan fungsi Custom_AddListMenuItems sebagai berikut,

function Custom_AddListMenuItems(m, ctx)

  AddCommentSubMenu(m,ctx);
  AddAttachmentSubMenu(m,ctx);
  CAMSep(m);
  return false;
}

Fungsi “CAMSep(m)” berguna untuk membat pembatas dan kembalian false (return false) dihasilkan agar konteks menu default tetap dirender. Untuk membuat menu “Comment” dan submenu dibawahnya, kita buat fungsi baru “AddCommentSubMenu(m,ctx)” seperti dibawah,

function AddCommentSubMenu(m,ctx)
{
    strDisplayText=”Comments”; 
    strImagePath=ctx.imagesPath+”reply.gif”;
    var sm=CASubM(m,strDisplayText,strImagePath,””,400);
 
    sm.id=”ID_Comment”;
    var menuOption;
    
    // define your own action
    strAction=””;
    menuOption=CAMOpt(sm, “View comments”, strAction,””);

    menuOption=CAMOpt(sm,”Add comment”, strAction,””);
}

Fungsi “CASubM()” adalah kunci untuk membuat sub menu. Jika kita lihat definisi CASubM() didalam ows.js, kita dapat temukan definisi fungsi itu sebagai berikut,

function CASubM(p,wzText,wzISrc,wzIAlt,wzISeq,wzDesc)

Disini kita gunakan intuisi untuk menterjemahkan parameter itu (so just guessing – OK),

– p , parent menu yang akan ditempel sub menu
– wzText , teks yang akan ditampilkan di sub menu
– wzISrc  , lokasi ikon untuk sub menu
– wzIAlt   , teks alternatif untuk ikon 
– wzISeq  , (gak yakin) tapi mungkin urutan sub menu
– wzDesc ,  (gak yakin) kemungkinan besar adalah deskripsi, tapi didalam tidak pernah digunakan didalam ows.js

Yah, singkat kata, kita hanya perlu melakukan modifikasi parameter  p, wzText, wzISrc, wzIAlt dan menggunakan nilai default untuk parameter-parameter yang lain.

Setelah selesai, letakkan script tersebut secara inline maupun sebagai reference , dan dijamin Anda akan mendapatkan sub menu untuk item konteks.


Posted in Microsoft Sharepoint, Office 12, Office Server 2007, Tips and Tricks